Sunday, October 30, 2011

Review: Garnier BB Cream

I recently won two giveaways for these creams hosted on Lilit's blog Makeup and Macaroons and Coco's blog Prettymom. I know right? Pretty lucky to win twice!!

Garnier Miracle Skin Perfecter in Light

As part of the giveaway you were sent two creams, one in light and the other medium. I am going to be giving away one set of these creams in my 100 follower giveaway coming up soon so keep a look out for that if you are keen to try these!

BB creams have been pretty popular in the online beauty world for a while now, however they can be tricky to get your hands on so to have a company like Garnier, which is widely available in a lot of countries, release their own bb cream is pretty cool. 

Swatch of BB cream in shade Light

Now since I haven't tried any other brands of BB cream I cannot give you a comparison of this one to those but from what I have seen online these creams differ a little from the original asian-branded ones. For starters they seem to be thicker than the average bb cream and look to me more like a tinted moisturiser.  Also a lot of the bb creams I have seen reviewed seem to be a bit ashy in colour and then change to suit your skin tone. With this cream I do see it changing to suit my skin tone but only slightly.

Left: Light shade, Right: Medium shade

Garnier claims that "skin is beautified, hydrated and protected" and that it "evens complexion, reduces sun spots & imperfections, boots healthy glow and is a tinted 24H hydration with UV protection of SPF 15"

So what do I think? Well here's a list of the good and the bad.

Pros;

  • Evens out skin tone and covers minor imperfections.
  • Doesn't feel heavy on the skin.
  • Changes slightly to suit the colour of your skin.
  • Provides a nice "no makeup" base.
  • Not greasy.
  • Applies nicely with fingers. 
  • Leaves you with a nice glow and slightly dewy look.
  • It has an SPF 15 so gives you some protection from the sun.

Cons;
  • It has a strong floral scent which seems to stick around once applied.
  • It's only available in two shades, so hard to match if you aren't similar to one of the shades.
  • Doesn't last all day, however when I have set this with a powder like my MAC MSF I find it does last a whole day at work.
  • Only comes in a 15ml tube where most foundations are 30ml. **Edit: It's actually 50ml sorry! I fail at reading tubes clearly...**

Cue scary before and after photos! Eeeeek

Left: Before, Right: After application of bb cream

Left: Before, Right: After

Would I buy this? Absolutely for $13.95AUD it is rather affordable and on the days I don't want to put on a full face of foundation I have been using this and really liking the natural looking result. 

Do I recommend it? I'd recommend this product to people looking for a light coverage tinted moisturiser whose skin tone fits either one of the two shades. I think it would be more suited to those with normal or dry skin as it does leave a dewy look to the skin, which I know a lot of oily skinned girls aren't a fan of. However, if you set it with a powder it tones down the dewiness. If you are sensitive to scents I would not recommend this for you. 

And here is a close up look of the product on my skin;

Close up of bb cream on my skin

As you can see from the photos it is quite light coverage but I find it still covers minor imperfections and it does even out my skin tone nicely. 

Garnier Miracle Skin Perfector can be purchased anywhere that stocks Garnier. For example Priceline, Big W, K-Mart, Target, supermarkets or selected chemists.

Have you tried this yet? What are your thoughts?

Hope you are having a great weekend!!

Hannah xo

Monday, October 24, 2011

Review: YSL Rouge Volupte Lipstick No 30

I recently scored this little baby from my mum after she went on a trip overseas. I have been leeming this particular lipstick for a long time now after seeing this particular shade featured on PS It's Vida's blog numerous times. 

YSL Rouge Volupte Lipstick in No 30 Faubourg Peach

First of all can I just say this has got to be the most gorgeous packaging of a lipstick I have seen yet. It's gold and shiny and has the colour of the lipstick in between gold detailing in the middle of the tube. It is also quite heavy which I like in a high-end lipstick as it adds to the expensive feeling. 

Once opened I have discovered a flaw in the packaging. When winding the lipstick up and down I have noticed that some of the product gets caught around the sides of the tube. However overall I love the packaging. The lid closes tight as well so you won't have lipstick all over the inside of your handbag. Not something you want, especially when it's an expensive lippy!

On the left you can see where the lipstick gathers on the tube.

The lipstick does have a scent to it. For anyone that is a candy junkie it smells a little bit like those sugared peach lollies that are shaped as a heart. Nope just me? Ok haha well it smells like peach candy. The scent does tend to linger a little bit so those sensitive to smells might not like this. I am not sure if all the colours have the same scent as I thought it a bit coincidental that it smelled like those peach lollies and it was a peach colour.

Swatch time :)

The formula of this lipstick is very creamy. It goes on very easily, however doesn't always go on evenly straight out of the tube. For a more even application I recommend adding a couple of layers and patting them in with your finger each time or using a lip brush. Due to the creaminess of the formula it doesn't last the longest time on your lips. On my lips it lasted just over an hour before I had to re-apply. (However, I tend to rub my lips together frequently so that could contribute) But when the lipstick is this gorgeous I don't mind whipping it out to re-apply every now and then.

The colour of this particular shade is a light peachy colour. It doesn't have any shimmer but due to the creamy formula it does have a sheen to it. It has great pigmentation and shows up nicely on my lips which are quite pink naturally. 

YSL Rouge Volupte lipsticks retail for $55AUD in Australia and $34.00USD in the US. However you can buy them currently on Strawberry Net for $33.50AUD with free shipping :)

And the downside to swatching and taking photos outside? If you drop it it gets a little grassy!

The danger of blogging outside.

Have you tried these lippies? What's your opinion??

Hannah xoxo

Friday, October 21, 2011

Update!

Hey guys,

Sorry I haven't posted in a while I have been crazy busy and unfortunately it doesn't look like I will get to post until next week :( I am going camping in a few minutes for the weekend in Margaret River. Hard life I know right haha

I miss posting, so hopefully I will get back into regular posts when I get back.

Hope you guys are all great! Miss you xoxo


Hannah xox

Wednesday, October 12, 2011

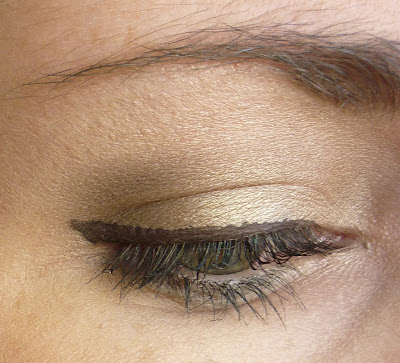
EOTD: Featuring MAC's Coquette and Sumptuous Olive

I have used MAC's Coquette eyeshadow to fill in my brows for a long time now but I never considered using it as an eyeshadow....stupid I know right?

Well yesterday I was like you know what that could make a good outer corner colour/crease colour!! And out of that this eye look was born. I'm so glad I branched out and used this as an eyeshadow, it really looks great on my green eyes!!

So I thought I would share it with you all now :)

Just for reference Coquette is a matte brown/khaki shade, if you haven't seen it before there is a swatch at the end of this post. 


To create this eye look I first primed my eyes with Urban Decay primer potion. I then added Nyx Jumbo Eyeshadow pencil in Milk to the inner corners and under the brow just to brighten them up a bit. A swipe of MAC's Brule all over the lid was next before I placed Coquette in the outer corner and blended it inwards. Sumptuous Olive was added to the inner corner and lid and the crease was blended out with MAC's Patina eyeshadow. UD's Sin was added to the brow and inner corner as a highlight.


To create the illusion of thicker lashes I added Savvy by DB's Liquid eyeliner in Brown to the upper lash line with a slight wing. A coat of Revlon's Fabulash mascara completed the look. 

Full face

Products used to create this eye look

Here are the products I used to create this eye look, from left to right; UD Primer potion, Revlon Fabulash, Savvy by DB Liquid Eyeliner in Brown, Nyx Jumbo Eyeshadow pencil in Milk, Sigma E70, MAC 217, UD Sin, MAC Coquette, MAC Sumptuous Olive, MAC Brule and MAC Patina.

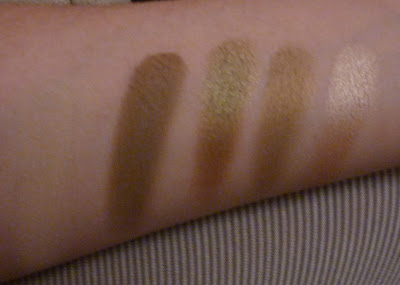
Swatches of the shadows; L-R: Brule, Coquette, Sumptuous Olive, Patina and Sin

Do any of you own Coquette?? What are your thoughts?

Hannah xoxo

Sunday, October 9, 2011

Review: MAC Paint Pot in Indianwood

I have been lusting over this particular paint pot for a while now and was lucky enough to have my mum bring it back for me from Italy. 


Since buying my first paint pot in Rubenesque I hadn't really been blown away by them like most people seem to be. However again and again I kept hearing of how much people loved them and thought maybe my one was just a dud. So I thought I would give them another go and this time I was definitely blown away.

Indianwood is apart of the permanent paint pot collection which MAC describes as an "metallic antique bronze" and I think that sums it up perfectly. The colour reminds me a lot of the MAC eyeshadow Woodwinked. One thing I have noticed is that when applied to my eyes in tends to turn a bit more of a coppery colour (which Woodwinked also does) so I do think the colour will differ slightly depending on your skin tone, however, it's a very universal colour that anyone could pull off. 


The thing that blew me away about this paint pot as opposed to Rubenesque is that it is a lot thicker in consistency and therefore shows up a lot more pigmented, which is a big improvement. It also has amazing staying power. I have normal/dry skin and where Rubenesque creases on me within a couple of hours Inidanwood lasted my whole working day, which is about 12hrs. This was without a primer underneath and without any shadow to set it. 


That's the other thing I love about this paint pot, you can just swipe it over your lid, blend the edge out with a skin-toned matte shadow and you have a gorgeous look that literally takes maybe a minute to do. Especially good when you are up at 6.30am and just want to go back to bed!

Photo taken in the morning before work

Here I am just wearing Indianwood all over and blended out the crease with the colour Naked from the naked palette (a matte light brown). I also smudged some black liner in the outer corner. 

Same day but 12hrs later (excuse the bad lighting, it was dark out!!)

And here is the same look but 12 hours later! As you can see it still looks pretty much identical to when I first applied it. 

Indianwood can be applied with a brush (I use a concealer brush) or just with your fingers, which is what I prefer as the warmth in your finger helps to blend the colour. I also find that the colour is even more pigmented on the eye when applied with a finger. 

Would I repurchase? Absolutely. Great pigmentation, Amazing staying power and a beautiful colour!

Indianwood paint pot can be purchased from MAC for $35AUD. (The US price is $17.50USD)


Have you tried Indianwood? What is your opinion on MAC paint pots?

Hope you are all having a great weekend!!

Hannah xoxo

Sunday, October 2, 2011

My First Blog Award!! :)

Yay :) My first blog award!! Many thanks to Candice from YouReview who awarded me with this blog award. Definitely check out her blog, she's new to blogging but already has lots of awesome reviews!

So this is the Tell Me About Yourself blog award.


The rules are to;

1. Thank the person who awarded it to you and give a link back to their blog. Check :)

2. Write 7 random facts about yourself

3. Then spread the love and award to 7 other bloggers.


Ok 7 random facts..hmmmm

Well...

1. Growing up I was the biggest tom boy ever. I had a boy haircut and was always wearing a hat. I also spent every friday arvo fishing with all the boys haha Safe to say nowadays I am a bit more girly and have ditched the hat although I do still love to fish.

2. I hate bugs but cannot stand the thought of actually killing one. I start to think about its bug family and get all sad haha

3. I have an accounting degree but have no desire to be an accountant.

4. I still have my 5ive CD...If you don't know who I'm talking about get yourself to youtube now!

5. Speaking of youtube I cannot help but laugh histerically every time I watch this video.

6. I still watch One Tree Hill and love every minute of it! (shut up) haha

7. I don't like mint unless it's combined with chocolate.

7 random facts...Check :)

Ok now to spread the love! I award this to the following lovely ladies, all who have great blogs which are must-reads in my blog feed.

Such a Beautiful Life
Beauty in the Sky
Vintage Makeup
Prettymom
Twinxntrax
Pretty in the Desert
Haute and Stylish


Thanks so much again to Candice for awarding me with my first blog award!! 


Hannah xoxox

Mini Nail Polish Haul & Swatches

Hey guys,

Hope you've all had a good weekend :)

Apparently I figured that my nail polish collection was clearly not big enough this weekend and decided to add 3 more bottles to it haha

CG White on White, Butter London Fash Pack, CG Gussied Up Green

Yesterday while visiting Robbie's vet, which is conveniently located across the road from a beauty and hair supplies store I decided to check out the China Glaze stand to see if any colours caught me eye. Three did although I managed to contain myself to just two. 

They are White on White;


And Gussied Up Green. (The one I left behind was a grey colour called Recycle)


The third was added last night when my friend and I hit the town for some drinks. Her feet were hurting so we decided to pop into the chemist for some party feet and when we did I stumbled across a Butter London display! Pure gold...and as I had already had a couple the price tag of $19.95 a bottle didn't stop me from picking up this pretty brown colour called Fash Pack.


I love white polish and I already own the Revlon one but I hate the formula, it always bubbles on me. So  I thought I would see how the China Glaze one held up. It didn't bubble so thats a plus but I will have to see with a full manicure to see what it's really like.

Gussied Up Green is an amazing colour. It has so many duo-chromes its a tad ridiculous....blue....purple ....brown.. everything. That's what drew me first to this colour. The bottle is just so reflective and its a gorgeous shade of emerald green which reminds me of MAC's Humid eyeshadow. 

Fash Pack is a beautiful shade of light brown with a bit of taupey-ness to it. It also has very fine gold shimmers in it which adds a layer of depth to the polish. This is my first Butter London polish as I didn't know they were sold here in Oz. I quite like the formula but am not very happy with the brush, it's just too short for my liking. Below you can see it compared to the China Glaze wand. However, I do love the packaging of this polish, it's just so damn cute and stylish.

Comparison of the wands

And here are the swatches :) All are two coats of polish without a top coat.

L-R: Fash Pack, White on White & Gussied Up Green


Do you guys own any of these polishes? What do you think? Have you tried Butter London?

Hannah xoxo